Водопроводные и канализационные трубы суровой зимой могут промерзать, создавая домовладельцам массу неприятностей. Предотвратить проблему способна укладка нагревательного кабеля. Рассмотрим виды проводников, способы монтажа (наружный либо внутренний) и потребляемую ими мощность.
Виды применяемых проводников
Греющие кабели могут быть:
резистивный, в котором нагревается сам металлический проводник;
кабель саморегулирующийся, в котором греется полимер, расположенный между двумя проводами.
Резистивные, независимо от погодных условий, всегда выделяют одно и то же количество тепла. Применять данный нагревательный провод без датчиков температуры и терморегулятора нерационально. Саморегулирующий греющий кабель благодаря применяемой металлополимерной матрице сам меняет свою температуру: при разогреве полимер выделяет меньше тепла, остывая – больше. Коррекция температур, протекающая на участке провода, не зависит от состояния соседних участков.

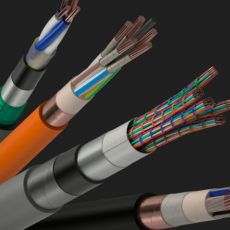
Резистивные нагревательные кабели нельзя укладывать вплотную, запрещено также их взаимное пересечение. Если подобное случится, проводник перегреется и выйдет из строя. По этой причине монтаж резистивного греющего провода требуется выполнять особо тщательно. Кроме того, необходимо отметить, что данный проводник может быть:
одножильным;
двухжильным.
Вторые применяются чаще, причина кроется в удобстве применения. Подключение греющего кабеля из двух жил не вызывает затруднений: на одном конце стоит заглушка, на втором закреплён электрошнур с вилкой, подключаемый к бытовой сети 220 В. Если же используется обогревающий кабель из одной жилы, то необходимо продумать подсоединение к электросети обоих концов, что сделать порой достаточно сложно. Также учтите, что разрезать резистивные нагревательные кабели нельзя, после этого о их нормальном функционировании можно забыть. Поэтому проводник, имеющий избыточную длину, всё равно всегда укладывается целиком.
Единственным ощутимым для потребителя преимуществом резистивного электрического нагревательного кабеля является его цена. Она гораздо ниже, чем у саморегулирующегося кабеля.
Какого бы типа нагревательные кабели не использовались, трубопровод требует утепления. В противном случае на обогрев будет израсходована слишком большая мощность, что соответственно скажется на увеличении расходов. Кроме того, в сильные морозы проводник может просто не справиться со своей работой.
Особенности моделей, самостоятельно выполняющих регуляцию
Саморегулирующийся нагревательный кабель обладает следующими преимуществами:
стойкость к ультрафиолетовому излучению, пламени и химическим веществам;
возможность нарезания отрезков любой длины (по отмеченным линиям разреза);
экономный расход электрической энергии;
предельно высокий показатель мощности.
влагоустойчивость;

Однако саморегулирующий греющий кабель желательно оснастить специальными защитными приспособлениями. Причина кроется в резком повышении мощности после подключения системы обогрева.
Греющий кабель внутри канализационной трубы прокладывают достаточно редко. Причина: на проводник воздействуют кислоты и щелочи, попадающие в водосток, изоляция быстро разрушается. Чаще всего такая мера применяется как временная и экстренная. Однако можно и специально приобрести греющий кабель для канализации внутри трубы с функцией саморегуляции. Его внешняя оболочка должна быть устойчива к агрессивной внешней среде.
Установка системы обогрева
Монтаж греющего кабеля может осуществляться как внутри, так и снаружи трубы. Причём для разных способов применяются провода, отличающиеся своими техническими характеристиками. Эта информация всегда приводится производителем.
Греющий кабель внутри трубы должен иметь:
степень электрической защиты не ниже IP68;
оболочку без примеси отравляющих веществ;
муфту, устанавливаемую герметично на конец проводника;
тройник, втулку уплотнения, втулку зажимную и прочее на другом конце проводника, на выходе из трубопровода.
Помните! Место соединения нагревательного провода с электрическим должно обязательно оставаться вне водной среды. Соединительная муфта не выдержит погружения внутрь трубы.
Особенности внешнего монтажа
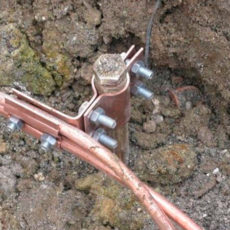
Греющий кабель для обогрева труб монтируется вплотную так, чтобы прилегал по всей площади. Поверхность, к которой он будет крепиться, предварительно очищается от всего лишнего: следов сварки, грязи, ржавчины, пыли, пр. Не должного остаться ни одного элемента, способного причинить вред схеме подключения. Монтаж осуществляется на чистый металл, фиксация выполняется каждые 30 см (можно чаще, лишь бы не реже). Удерживают проводник пластиковые хомуты либо металлизированная клейкая лента.
Пуская по трубе параллельно, не прикасаясь, 1-2 нитки провода, монтируют их там, где будет холодней – с нижней стороны. Если подключаются одновременно 3 и более проводника, располагаются они всё также с привязкой к низу трубопровода. Аналогично важна и выдержка расстояния между ними, особенно для резистивных моделей.
Можно осуществить укладку греющего кабеля спиралью, не забывая, что резкие и многократные изгибы ему противопоказаны. Сделать это допускается по-разному:
разматывая муфту шаг за шагом, намотать провод на трубопровод;
зафиксировать проводник с провисаниями (нижняя картинка рис.10), которые затем следует подмотать и прикрепить.
Если труба из пластика, то вначале для улучшения теплопроводности и повышения эффективности нагрева наклеивается металлизированный скотч. И только затем поверх него выполняем установку греющего кабеля.
Запирающие и регулирующие элементы трубопровода требуют большего расхода тепла. Поэтому на них нагревательные провода укладываются в несколько петель (не забывайте избегать резких изгибов!).

Утеплители
Минеральную вату любого происхождения для утепления труб канализации использовать не стоит. Причина проста – намокая, она теряет теплоизоляционные свойства. А со временем подмоченная и подсушенная минеральная вата вовсе превратится в труху. Также не лучшим вариантом будет применение утеплителя, сжимающегося под действием тяжести и, как следствие, теряющего теплоизоляционные свойства. Однако если труба проложена в специально построенной канализации, где на неё ничего не давит, допустимо применять даже поролон. Но если трубопровод закапывается, то требуется жесткая теплоизоляция.
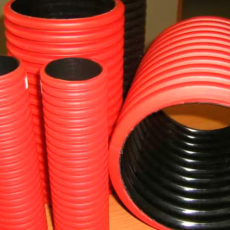
Как вариант, можно по сминаемому утеплителю пустить пластиковую канализационную трубу. Её жёсткость позволит защитить утепляющий материал (например, вспененный полиэтилен с закрытыми ячейками).
Неплохим решением будет применение пенополистирола, сформированного в виде участков труб различного диаметра. Подобный утеплитель часто именуют «скорлупой». Пенополистирол имеет приемлемые теплоизоляционные характеристики, не страшится влаги, без повреждений выдерживает определённые нагрузки (их размер зависит от плотности материала).
Технические параметры проводника
Скорость преобразования электрической энергии зависит от следующих факторов:
климатических условий (чем холодней, тем больше мощность потребуется);
способа прокладки трубопровода и его диаметра;
наличия либо отсутствия утепления;
способа прокладки провода (внутри трубы либо поверху);
вида применяемого проводника.
Каждый производитель приводит таблицы, по которым можно определить прогнозируемый расход мощности на 1 метр трубопровода. По ним и стоит ориентироваться рачительному хозяину. В качестве примера можно сообщить, что в средней полосе на обогрев 1 м трубопровода изнутри пойдёт 10 Вт/м, а при наружном обогреве израсходуется не менее 17 Вт/м. В данном случае рассматривается вариант с утеплением пенополистирольной скорлупой толщиной 30 мм.

Изготовить греющий кабель своими руками можно из П-274М (военно-полевого телефонного кабеля). Самодельный проводник не будет иметь саморегуляции и пищевой изоляции, но с нечастым наружным применением справится. Как видим, сэкономить и сделать греющий кабель своими руками можно, однако максимальная сила тока для такого изделия составит не более 9 А.
Стоит ли ставить терморегулятор
Есть серьезные основания устанавливать терморегулятор, даже если применяется саморегулирующий кабель. Ведь, если вода подаётся из скважины, у неё температура даже жарким летом будет немногим выше нуля. В таком случае обогрев будет вестись круглогодично, что явно не рационально. Конечно, летом обогрев можно отключить, но весной и осенью внезапные заморозки могут застать врасплох.
На подключённом терморегуляторе устанавливается температура отключения (допустим, +5°C). После чего не только заметно снизятся расходы на обогрев труб, но и продлится срок эксплуатации проводника.
Если в систему обогрева включён терморегулятор, то необходим и датчик температуры. Его надо установить так, чтобы он не улавливал нагрев, продуцируемый нагревателями. Другими словами, требуется зафиксировать датчик на трубе, изолировав от греющих кабелей
Сам терморегулятор лучше ставить в помещении. Он должен подключаться к электрическому щитку через защитный автомат и желательно УЗО (устройство защитного отключения). Низкая потребляемая мощность проводника позволяет использовать автомат номиналом около 6 А, номинал УЗО лучше взять ближайший больший, порядка 30 мА.
Проводник присоединяют к нужным разъемам на терморегуляторе. Если веток несколько, их пускают параллельно. К соседним контактам подключается температурный датчик. На терморегуляторе должна быть маркировка, сообщающая, как сделать правильно подключение. Если информация отсутствует — не рискуйте, приобретите другой прибор.


I seriously love your website.. Pleasant colors & theme.
Did you build this site yourself? Please reply back as I’m planning to create my own personal site and
would like to find out where you got this from or just what the theme
is named. Cheers!
obviously like your website however you have to check the spelling on several of
your posts. Many of them are rife with spelling issues and I in finding it very
bothersome to inform the reality however I’ll certainly come back again.
I will immediately snatch your rss as I can not find your email subscription link or newsletter service.
Do you have any? Kindly allow me recognise in order that I may just subscribe.
Thanks.
Wow, that’s what I was searching for, what a data!
present here at this website, thanks admin of this web site.
Your style is so unique compared to other people I have read stuff from. I appreciate you for posting when you have the opportunity, Guess I’ll just book mark this blog.
camiseta del manchester united
Hello, all is going well here and ofcourse every one is sharing data,
that’s truly excellent, keep up writing.
obviously like your web site but you need to check the spelling on quite a few of your posts. Several of them are rife with spelling issues and I find it very bothersome to tell the truth nevertheless I will certainly come back again.
If some one desires to be updated with newest technologies after that he must be
go to see this site and be up to date every day.
You really make it seem so easy with your presentation but
I find this matter to be actually something which I think I would
never understand. It seems too complex and extremely broad for me.
I’m looking forward for your next post, I will try to get the hang of it!
Spot on with this write-up, I honestly think this amazing site needs much more attention. I’ll probably be returning to see more, thanks for the advice!
This is my first time pay a quick visit at here and i am truly pleassant to
read everthing at alone place.
This is the perfect website for anyone who would like to
find out about this topic. You realize so much its almost tough to argue with you (not that I personally would want to…HaHa).
You certainly put a fresh spin on a subject which has been discussed for years.
Wonderful stuff, just wonderful!
Maximizing Efficiency: Advanced Strategies for Your CNC Workbench!
Introduction
What will you want to do? Take up higher-than-average strategies for CNC
Workbench where innovation and efficiency meet.
Find high tech features like quick changeovers and flexible scheduling as well as
the knowledge gain, education and training you need. Carefully put together in every detail and the machine
runs on its own to achieve top level of operational excellence; this is why our
CNC workbench is the highest standard of production in the
industry.
Optimizing Your CNC Workbench Layout!
• Importance of an ergonomic and logical layout
Ergonomic Design
Craftsmen prioritize ergonomic design for CNC workbenches, reducing fatigue.
Adjustable heights and angled surfaces enhance user
comfort. Key tools within arms reach streamline tasks. Proper lighting minimizes
strain.
Logical Arrangement
Logical placement of tools on a CNC workbench boosts efficiency.
Group related items for seamless access. Position frequently used tools at the forefront.
Label compartments for easy identification,
ensuring smooth operation.
Space Utilization
Maximizing space on a CNC workbench is crucial. Utilize CNC vertical machining holders for drills
and bits. Sliding drawers organize smaller components. Overhead shelves free up valuable work
surface. Efficient design accommodates more projects.
Accessibility Focus
Accessibility is key in a CNC workbench setup. Ensure clear
pathways for easy movement. Keep emergency stops visible and reachable.
Designate zones for different activities, enhancing safety.
User-friendly interfaces on machines aid in operation.
Workflow Integration
Integrating workflow into CNC workbench design enhances productivity.
Layout reflects the manufacturing process. Material intake and product output areas are distinct.
Centralized control panels streamline machine use. Organized tools reduce
downtime, boosting output.
• Tips for arranging tools and materials for easy
access and workflow enhancement
Vertical Storage
Maximize CNC Workbench efficiency with smart vertical storage
solutions. Racks and shelves hold materials, tools within reach.
Organize items by frequency of use, top for rare, bottom for common. Benefits include saved space, quick
access. Ideal for small and large workspaces alike is enhancing productivity significantly.
Labeled Bins
CNC Workbench organization excels with labeled bins. Store
bits, cutters, and jigs systematically. Each bin, tagged with contents,
streamlines finding parts. Reduces downtime is searching for components.
A mix of sizes accommodates diverse items. Essential for
maintaining a clutter-free environment is ensuring a
smooth workflow.
Shadow Boards
Implement shadow boards at the CNC Workbench. Outline tools on boards
for easy identification, return. Visual management tool prevents loss, misplacement.
Custom shapes signal correct storage spot for each tool.
Boosts efficiency, supports 5S methodology. This is Ideal for quick tool
retrieval, maintaining order.
Tool Holders
Optimize CNC Workbench with structured tool holders. Designate spots for drills, end mills, collets.
Ensures tools are always at hand, organized.
Magnetic, pegboard holders offer flexibility,
customization. This is crucial for streamlined operations, quick changeovers.
Tool holders transform workbench into a highly efficient station.
Tool Management Strategies!
• Best practices for organizing and maintaining CNC tools
Regular Inspections
For CNC Workbench, conduct inspections often. Check tools for wear, alignment issues.
Identify problems early, prevent machine
downtime. A routine, detailed examination ensures tools perform at peak.
This is key for high-quality output, maintaining high precision manufacturing in projects.
Essential step in tool management prolongs tool life.
Cleanliness Protocol
Maintain a clean CNC Workbench always. Dust,
debris affects tool performance, precision. Implement daily cleaning schedules.
Use appropriate cleaners for metal, electronic parts.
A tidy workspace prevents accidents, ensures tools’ longevity.
Cleanliness enhances operational efficiency, keeps the
workbench in optimal condition.
Sharpness Checks
Sharp tools are crucial at the CNC Workbench. Regularly test for dullness, wear.
Dull tools result in poor cuts, increased waste.
Use precision instruments to gauge sharpness. Immediate sharpening or replacement ensures consistent quality.
Sharpness checks are fundamental for efficiency, reducing material waste.
Inventory Control
Effective inventory control is key for CNC Workbench operations.
Catalog tools accessories with precise counts. Implement check-out, return procedures.
Regular audits prevent shortages, overstocking. This strategy optimizes tool usage, saves costs.
Inventory control keeps projects on schedule, ensures tool
availability.
Digital Tracking
Incorporate digital tracking for CNC Workbench tools.
Use software to monitor tool location, usage, maintenance schedules.
Real-time data aids in decision-making, prevents loss. Digital tracking simplifies inventory management, enhances
operational workflow.
• Implementing tool tracking systems to minimize downtime
RFID Tags
For CNC Workbench efficiency, RFID tags are key. They attach
to tools, allowing quick scans. This system updates tool status instantly, reducing
search times. Perfect for fast-paced environments, it keeps tool
tracking simple. Ensures tools are always ready, minimizing operational delays.
Essential for maintaining continuous workflow, RFID
tags are a game-changer.
Barcode Scanning
Barcode scanning at the CNC Workbench simplifies tool management.
Tools tagged with barcodes offer easy tracking. Scan to check tools in or out,
streamlining inventory. This approach enhances tool security,
prevents loss. It’s a practical solution for busy workshops; ensuring tools are always accounted for.
Quick, efficient, barcode scanning is indispensable.
Digital Logs
Digital logs are critical for managing CNC Workbench tools.
They record usage, maintenance, and location, offering a clear history.
This data helps plan for tool needs, ensuring readiness.
Access from any device makes information retrieval effortless.
It’s an effective strategy to avoid tool misuse and prolong their life.
Digital logs are a must-have for precision management.
Maintenance Alerts
Maintenance alerts for CNC Workbench tools are proactive.
They signal when servicing is due, keeping tools in top shape.
This system prevents unexpected downtimes, ensuring reliability.
Tailor alerts to specific tool usage patterns for best results.
It’s crucial for smooth operations; making maintenance alerts a wise investment.
Tool Lifecycle Management
Tool lifecycle management is vital at the CNC Workbench.
It tracks tools from purchase to retirement, assessing performance.
This insight aids in timely replacement decisions, optimizing investments.
Effective lifecycle management reduces waste, focuses on quality tools.
It’s key for operational excellence, ensuring every
tool performs optimally.
Enhancing CNC Machine Performance!
• Regular Calibration
Calibrating CNC machines regularly is crucial for optimal performance.
Schedule checks on spindles, axes for accuracy.
Calibration ensures precision in cuts, extends machine life.
Use calibrated instruments, follow manufacturer
guidelines. Regular calibration at the CNC
Workbench reduces errors, boosts efficiency. It’s a
non-negotiable practice for quality outcomes.
• Lubrication Schedule
A strict lubrication schedule for CNC machines prevents wear, tear.
Lubricate moving parts per OEM recommendations. Use quality oils, greases for longevity.
Proper lubrication maintains smooth operation, prevents overheating.
At the CNC Workbench, timely lubrication is key to machine
health. It saves on costly repairs, downtime.
• Upgrade Kits
Upgrade kits can significantly enhance CNC machine capabilities.
They include software updates, enhanced tooling options.
Installing the latest kits improves efficiency, accuracy.
Upgrades can extend machinery lifespan, add new features.
For any CNC Workbench, staying updated with technology is vital.
It ensures competitive edge, operational excellence.
• Speed Optimization
Optimizing speed settings on CNC machines maximizes
productivity. Adjust feed rates, spindle speeds
for material, tooling. Speed optimization reduces cycle times, improves finish
quality. Analyze performance data, adjust for optimal settings.
At the CNC Workbench, speed optimization is crucial for
meeting production targets, maintaining high standards.
• Precision Testing
Precision testing is essential for maintaining CNC machining accuracy.
Implement regular testing routines using precise measuring tools.
Test cuts, dimensional checks ensure adherence
to specifications. Precision testing at the CNC Workbench identifies calibration needs, prevents quality issues.
It’s fundamental for delivering consistent, high-quality products.
Feature Regular Calibration Lubrication Schedule Upgrade Kits Speed Optimization Precision Testing
Objective Ensure accuracy & precision Minimize
wear & tear Enhance capabilities Improve efficiency Validate machining accuracy
Frequency Quarterly/As needed Daily/Weekly As upgrades are
released Continuous monitoring Pre & Post-operation
Tools/Equipment Calipers, Micrometers Lubricants, Grease guns Software, Hardware kits CNC Controller settings Gauges, CMMs
Impact on Performance High precision & quality Extended machine life New functionalities Reduced
cycle times Error minimization
Skill Level Required High Moderate High High High
Cost Moderate to High Low to Moderate High Moderate Moderate to High
ROI High High Variable High High
Table on Enhancing CNC Machine Performance!
Material Handling and Preparation!
• Pre-Cutting Checks
Prioritize pre-cutting checks at the CNC Workbench for flawless operations.
Inspect materials for defects, dimensions accuracy before machining.
Confirm tool sharpness, alignment for precision. These steps
prevent waste, ensure product quality. Essential for maintaining
standards, pre-cutting checks are the first line of defense against errors.
• Material Labeling
Material labeling at the CNC Workbench streamlines workflow.
Assign labels detailing type, thickness, and intended use.
This practice avoids confusion, enhances efficiency. Labels act as quick references, speeding up material selection. For any project,
organized labeling is key to managing resources effectively, ensuring the
right material is always used.
• Moisture Control
Moisture control is critical in CNC Workbench environments.
Store materials in dry conditions are prevent warping, swelling.
Use dehumidifiers in humid climates to protect integrity.
Moisture-compromised materials affect precision, waste resources.
Proactive moisture control is a must for quality
outcomes, equipment longevity.
• Flatness Assurance
Ensure material flatness before CNC machining for optimal results.
Use precision levels, surface plates for verification. Flat materials eliminate
rework, enhance detail accuracy. Critical for intricate designs,
flatness assurance is foundational to achieving desired
finishes. It guarantees efficiency, reduces material strain at the CNC Workbench.
• Stock Organization
Effective stock organization boosts productivity at the CNC Workbench.
Implement shelving, categorization systems for order.
This approach minimizes search time, expedites selection. An organized stock area
supports seamless operations, allowing quick transitions
between tasks.
Workflow Automation on the CNC Workbench!
• Software Integration
Integrating advanced software with the CNC Workbench streamlines operations.
It enables precise control over machining processes, enhancing efficiency.
Software such as CAD/CAM transforms designs into executable paths, reducing
manual input. Essential for high-volume production, it minimizes errors,
ensures consistency. Key to modern machining, software
integration is a cornerstone of automation.
• Pallet Systems
Pallet systems revolutionize material handling at the CNC Workbench.
They facilitate quick setup changes, maximizing
machine uptime. Automated pallet changes reduce manual labor, speed up production cycles.
Ideal for high-mix, low-volume jobs, they keep machines running
efficiently. Implementing pallet systems is a strategic move towards lean manufacturing.
• Automated Loading
Automated loading mechanisms enhance productivity at the CNC Workbench.
Robots or conveyors supply materials, ensuring continuous operation. This
automation reduces human intervention, lowers the risk of
injuries. It guarantees a steady supply of
workpieces, optimizing machine use. Crucial for long runs, automated loading is a key efficiency driver.
• Program Sequencing
Program sequencing software optimizes the CNC Workbench workflow.
It schedules tasks for minimal tool changes, reducing idle time.
Advanced algorithms predict efficient sequences, saving valuable machining time.
This approach is vital for complex parts, ensuring timely
completion. For peak performance, program sequencing is indispensable.
• Tool Path Optimization
Tool path optimization software is critical for enhancing CNC Workbench efficiency.
It calculates the most efficient routes, reducing machining time, tool wear.
Optimized paths ensure smoother finishes, extend tool life.
Key for complex geometries, it significantly reduces cycle
times. Tool path optimization is fundamental for quality
and speed.
Operator Training and Skill Development!
• Continuous Learning
Continuous learning is pivotal for CNC Workbench operators.
It ensures skills remain sharp in evolving manufacturing
landscapes. Workshops and webinars offer new techniques,
tooling insights. Embracing a culture of learning fosters innovation, keeps teams ahead of medical industry curves.
• Skill Certification
Skill certification elevates CNC Workbench operations.
It validates expertise in machining, programming,
and maintenance. Certification programs from recognized institutions set benchmarks for quality, safety.
Operators with certifications bring verified skills, enhancing team capabilities.
Pursuing these credentials supports career progression, workplace efficiency.
It’s a commitment to professional development, operational excellence.
• Safety Training
Safety training is non-negotiable at the CNC Workbench.
Comprehensive programs cover emergency procedures, equipment handling, and hazard recognition. Regular drills reinforce safety protocols, ensuring readiness.
A safe workplace minimizes accidents, boosts morale.
Investing in ongoing safety training is essential for
protecting operators, maintaining high productivity standards.
• Software Proficiency
Software proficiency is critical for maximizing CNC Workbench
potential. Mastery over CAD/CAM systems enables complex
designs, efficient toolpaths. Training sessions update operators on latest software
enhancements, integration features. High software proficiency translates to reduced
setup times, error margins. It’s key for streamlined operations, delivering precision on complex projects.
Advanced Setup Techniques!
• Fixture Innovations
At the CNC Workbench, fixture innovations are transforming setup efficiency.
Customizable clamps and modular fixtures reduce setup times,
enhance precision. These advancements support versatile machining processes, accommodate complex parts.
Implementing innovative fixture solutions is crucial for competitive manufacturing, ensuring quick adaptation to varied production demands.
• Rapid Changeovers
Rapid changeover techniques at the CNC Workbench are pivotal for minimizing downtime.
Utilizing quick-release mechanisms and preset tooling accelerates transitions between jobs.
This strategy optimizes milling machine utilization, boosts output.
Emphasizing speed and efficiency, rapid changeovers are
essential for meeting tight production schedules in dynamic manufacturing environments.
• Tolerance Strategies
Implementing precise tolerance strategies at the CNC Workbench ensures
high-quality production. Advanced measuring tools and software
monitor machining accuracy, facilitating adjustments in real-time.
This proactive approach to tolerance management minimizes rework, maintains product consistency.
It’s fundamental for achieving excellence in precision manufacturing,
satisfying stringent quality standards.
• Adaptive Programming
Adaptive programming technology revolutionizes operations at the CNC Workbench.
It dynamically adjusts cutting conditions based on real-time feedback, optimizing tool paths.
This approach reduces tool wear, improves surface finish. Adopting adaptive programming enhances machining efficiency, adapts
to material variances. It’s a smart strategy for
modern, data-driven manufacturing.
Conclusion
Utilizing proven CNC machining features and greater than ever advancements, provides you
with opportunities to excel in modern machining. And, this is achieved
through an employee commitment to seeking constant
improvements of the products and technologies combined, which is more than just a dream but
a reality in the company. This trip is a stepping stone for other journeys in the future, and you can visit CNCYANGSEN to discover more.
Avoid the quandary of CNC Workbench, and choose the path of success where only the best can harbor the ultimate achievement.
What’s up mates, its great article about teachingand completely defined, keep it up all the
time.
I pay a quick visit each day a few web pages and websites to read content, except this blog offers
quality based posts.
When I initially left a comment I seem to have
clicked the -Notify me when new comments are added- checkbox and from
now on each time a comment is added I receive
4 emails with the exact same comment. Is there a means you can remove me from that service?
Thank you!